
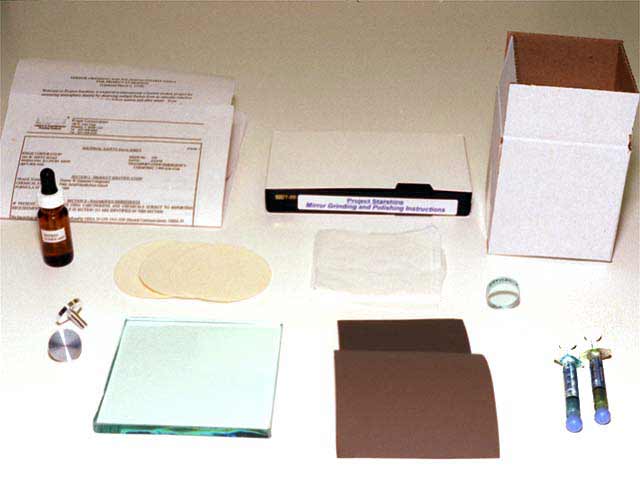
Welcome to Project Starshine, a cooperative international volunteer student project for measuring atmospheric density by observing and measuring the position of sunlight flashes from an optically reflective satellite as it passes across the starry sky before sunrise and after sunset. Your participation in the mirror grinding and polishing phase of this project is vital to the success of the overall program. These Aluminum mirrors are quite easy to polish, but extremely easy to scratch, if you don't keep everything absolutely clean, so please follow the instructions as carefully as possible.First of all, unpack the contents of your Starshine Mirror Grinding and Polishing Kit (Fig 1) and make sure all the required materials are there. In addition to the set of instructions that you are presently reading, you should find the following items (Fig 2): (Click on these colored figure numbers for color images of the related steps in the grinding and polishing process. After you've finished looking at each image, click on BACK to return to the main text.)
1. Wash the glass backing plate in running tap water, dry it with a clean paper towel and place it flat on another piece of clean paper towel on a clean, smooth, horizontal surface, such as a table or a lab bench, which is at a comfortable working height for you. Wash your hands with soap and water and dry them with a towel. Seat yourselves (this is a team project) in chairs or lab stools at the table or bench.PHASE ONE - MIRROR GRINDING
- Two unpolished 1" (2.5 cm) diameter circular Aluminum Starshine mirrors with short stems protruding from their backs.
- One 5" x 5" (12.5 cm x 12.5 cm) backing plate of 3/8" (1 cm) thick glass.
- One square of "0" grit Buehler Special Emery paper.
- One square of "000" grit Buehler Special Emery paper.
- One syringe of Hyprez 3(W)40-MA Diamond Polishing Compound.
- One syringe of Hyprez 1(W)47-MA Diamond Polishing Compound.
- One dropper/bottle of Hyprez lubricant.
- Four circles of Kempad Polishing Cloth.
- Twelve sheets of lint-free lens tissue.
- One 1" (2.5 mm) diameter x 3/8" (1 cm) thick glass optical inspection flat.
- One set of Material Safety Data Sheets.
- One instructional VHS videotape. Please watch this tape before proceeding.
- One small, self-addressed box in which you will return your polished mirror to Project Starshine. Don't forget to place the correct postage on the box before mailing.
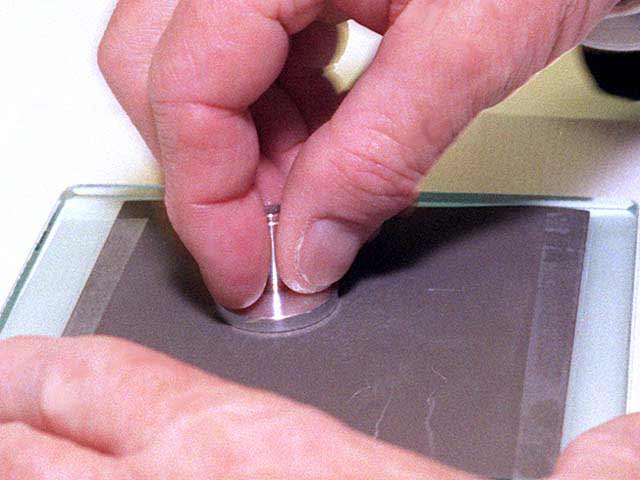
2. Place a square of "0" grit Buehler Special Emery paper, rough side up, on your glass plate and tape it down along its edges with strips of Scotch (or equivalent) Cellophane tape. Pick up one of your Starshine aluminum mirrors (we'll call this your #1 Starshine Mirror) by its stem and set it on the Special Emery paper, with the mirror's flat side down, against the Emery paper (Fig 3). Press down firmly on the mirror and grind its flat face against the Emery paper, using clockwise swirling motions, for about five minutes. Let each student spend a fraction of the time grinding, then pass it on to the next participant.
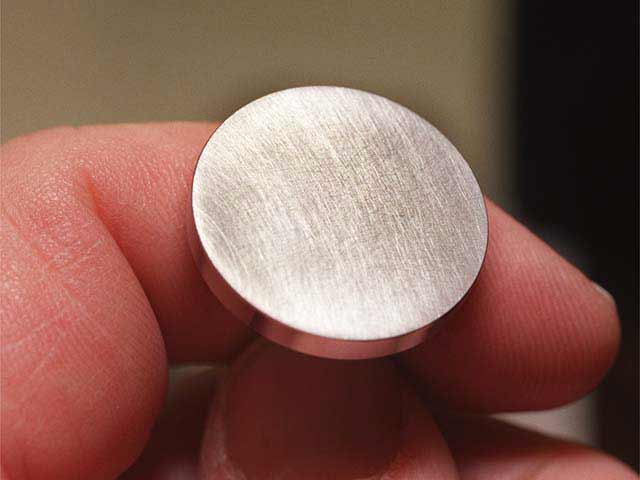
3. Wash the mirror in running tap water until all the Aluminum dust is gone. Examine the surface of the mirror (Fig 4). There should be no shiny tool marks remaining from the original machining process. If there are, dry the mirror with a clean piece of paper towel and repeat step 2 until the shiny marks are completely gone. When you are satisfied with the result, wash your #1 Starshine mirror in running tap water, dry it with a paper towel, and set it aside, face up, on a clean paper towel. Each participant should wash his or her hands with soap and water to get rid of the Aluminum dust and dry them on a towel.
Repeat steps 2 and 3 with your #2 Starshine Mirror, using the same piece of "0" grit Emery paper that you used for mirror #1.4. Peel the Scotch tape off the glass and discard the tape into a wastebasket. Knock the aluminum dust off the "0" grit Special Emery paper into the wastebasket and set the square of Emery paper aside, just in case you drop a finished mirror on the floor or encounter some other minor disaster and need to repeat the whole process later on.
5. Wash your mirror and the glass backing plate in running tap water, being careful to remove the tape residue and any Aluminum dust that may be on the glass or mirror, then dry the glass and the mirror with a clean paper towel. Wash your hands with soap and water and dry them with a towel.
6. Place the glass backing plate flat on a clean paper towel on your working surface, once again, and tape a square of "000" grit Special Emery paper, rough side up, to the glass with strips of Scotch tape, just as you did in Step 2. This "000" paper contains smaller grinding particles, or "grit," and will produce finer, more shallow, scratches on the face of your mirror than the "0" paper did, which is good. Hold your #1 Starshine mirror by its stem and set it on the Emery paper, flat side down. Grind the face of the mirror flat against the Emery paper, using clockwise swirling motions, just as you did in Step 2, but using a lighter touch. Here again, and throughout all the grinding and polishing steps, share the work with the other participants.
7. After about ten minutes, wash the mirror in running water and examine its face (Fig 5). It should now be a dull, uniform gray, with a lot of shallow scratches, all of about the same depth. If you see that some deep scratches or shiny spots are still there from Step 3, repeat step 6 until a uniform shallow scratch depth is achieved. When you're all satisfied with the result, wash your mirror in running tap water, dry it off with a paper towel, and set it aside, face up, on a piece of towel.Repeat steps 6 and 7 with your #2 Starshine mirror, using the same piece of "000" grit Emery paper that you did for mirror # 1.
8. Peel the Scotch tape off the glass and discard the tape into a wastebasket. Knock the aluminum dust off the "000" grit Special Emery paper into the wastebasket and set the square of Emery paper aside, in case you need to repeat the whole process later on.
9. Wash the sheet of plate glass in running tap water, being careful to remove the Scotch tape sticky residue and Aluminum dust from the glass plate and the mirror, then dry the glass and the mirror with a paper towel. Wash your hands with soap and water and dry them with a towel.
Congratulations!! You have completed the grinding phase of the overall process. You are now ready to move on to the polishing phase, which is much more delicate than the grinding phase and requires special attention to detail and cleanliness to keep from winding up with tiny scratches and dimples in the surface of the finished mirror.
PHASE TWO - MIRROR POLISHING
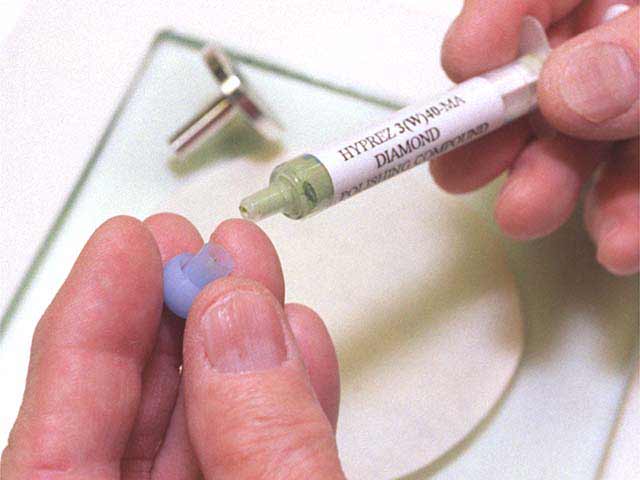
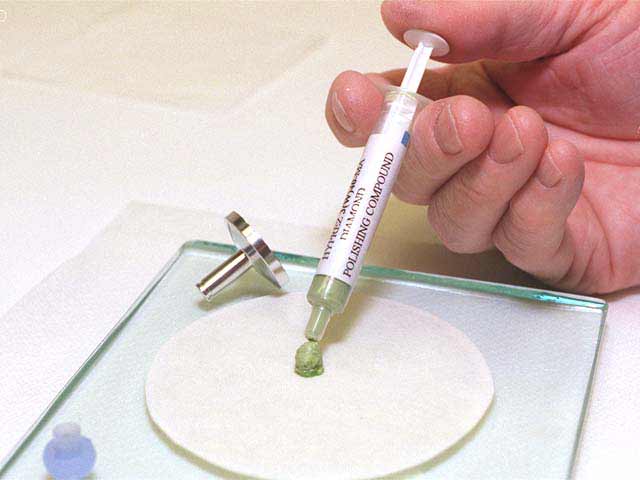
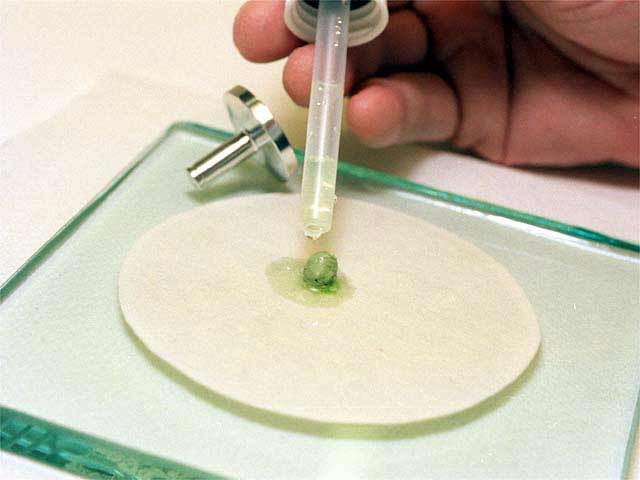
10. Place your glass backing plate flat on a clean paper towel on your working surface. Peel the slick backing paper off a circle of Kempad Polishing Cloth (Fig 6). Discard the slick backing paper into a wastebasket. Place the circle of Kempad Polishing Cloth very carefully on the glass plate, with its sticky side down, and smooth it out with the edge of your hand so there are no wrinkles in it (Fig 7).11. Remove the blue cap from the syringe of Hyprez 3(W)40-MA Diamond Compound (Fig 8). Press gently on the syringe's plunger and squeeze out a pale green "pea-sized" blob of the compound onto the center of the circle of polishing cloth (Fig 9). Be very careful not to press on the plunger too hard, because you might waste the compound. Put the ball cap back on the syringe and set the syringe down out of the way. Now, unscrew the top of the Hyprez Lubricant bottle and squeeze and release the rubber bulb to suck up some Hyprez Lubricant from the bottle. Take the dropper out of the bottle and squeeze eight drops of the lubricant onto the blob of diamond paste (Fig 10). Be careful not to let the tip of the dropper touch the blob of paste. Put the dropper back into the bottle and screw the cap on. Set the bottle down out of the way.
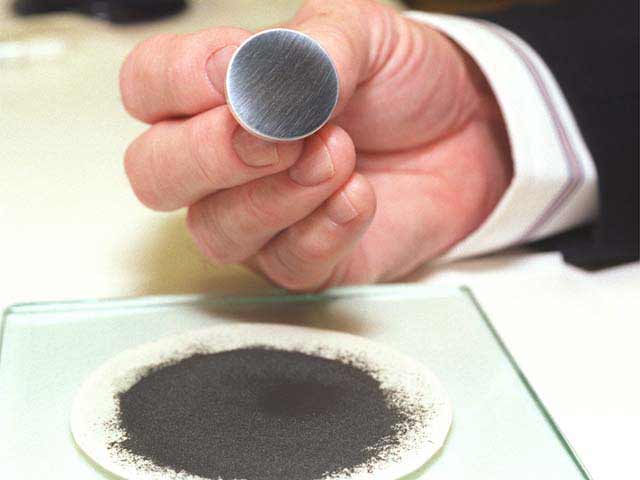
12. Hold your clean and dry #1 Starshine mirror by its stem and set it face down on the blob of lubricated diamond "slurry" in the center of the circle of polishing cloth (Fig 11). It is very important not to let any water get into the diamond slurry. Be sure your mirror is dry before you set it on the slurry. Polish the mirror against the lubricated slurry on the polishing cloth for about ten minutes, using clockwise swirling motions and applying a light downward force. From time to time, use the edge of the mirror to work the lubricated diamond slurry back to the center of the polishing cloth. The slurry will turn dark gray and then black (Fig 12) from embedded aluminum dust as the polishing process goes on. The diamond compound doesn't get used up in the polishing process; it just dries out as the Hyprez lubricant evaporates. So, every time the lubricant evaporates and the polishing motion becomes harder to perform, add two drops of lubricant to the slurry and go on with your polishing. Do not let the lubricant dry out while you are polishing your mirror, because you will damage the surface of the cloth with your polishing motions. (However, if you come to the end of a class period and have to stop polishing for the day, it's O.K. to let the lubricant dry out overnight. Just be sure to add four drops of fresh lubricant to the pad before you start polishing again.)13. After about ten minutes of polishing, wash your mirror in running tap water and examine its surface. Wash your hands with soap and water and dry them on a towel. Dry the mirror with a piece of lint-free lens tissue that is included with your kit. You should now be able to see a blurry image of your own face in the mirror. If you can still see lots of fairly prominent scratches in the surface of the mirror (Fig 13), add two drops of lubricant to the slurry, and keep on polishing. Repeat this step until only fine scratches and indentations are visible. When you are satisfied with the result, wash your mirror off in running water, dry it off with a piece of lint-free lens tissue and set it aside, face up, on a clean paper towel. Wash your hands and dry them on a towel.
Repeat steps 12 and 13 for your #2 Starshine Mirror, using the same circle of Kempad polishing cloth and Hyprez 3(W)40-MA polishing compound as you used for your #1 mirror. You don't need to add any more polishing compound.
14. Peel the Kempad polishing cloth off the glass backing plate. This is pretty hard to do, because the sticky stuff on the back of the pad is really strong. Find someone with good fingernails and strong fingers to do this job. Discard the cloth pad into a wastebasket. Carefully wash the glass plate in running tap water, being sure to remove every bit of the sticky backing left over from the first pad of Kempad polishing cloth, and dry the plate with a paper towel. Wash the mirror in running water and dry it with lint-free lens tissue. Wash your hands and dry them on a towel.15. Place the glass backing plate flat on a clean paper towel on your working surface. Peel the slick backing from another circle of Kempad polishing cloth. Discard the slick backing into a wastebasket. Place the circle of Kempad polishing cloth very carefully on the glass plate, sticky side down, and smooth it down so there are no wrinkles in it.
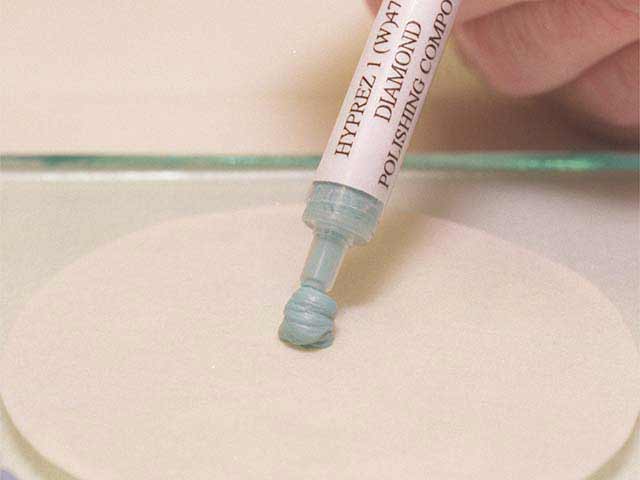
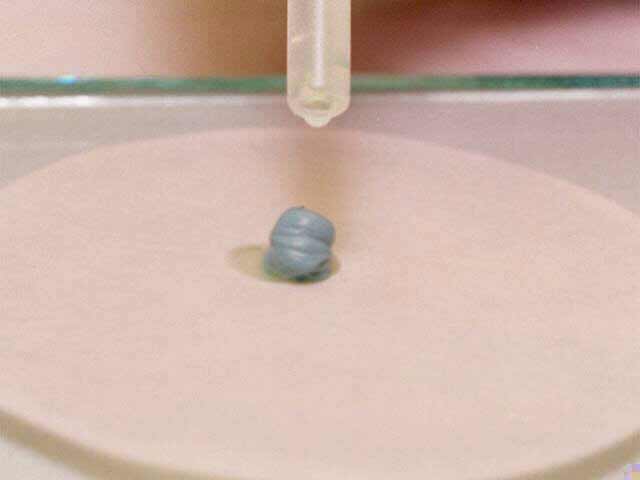
16. Remove the blue cap from the syringe of Hyprez 1(W)47-MA Diamond Compound. Press gently on the syringe's plunger and squeeze a pale blue "pea-sized" blob of the compound onto the middle of the circle of fresh Kempad polishing cloth (Fig 14). (This 1-micron paste has smaller particles of industrial diamonds in it than does the 3-micron compound that you've already used, so it will produce a smoother final finish). Once again, be very careful not to press on the plunger too hard, because you might waste the compound. Use the dropper to suck six or eight drops of Hyprez Lubricant from its bottle and dribble them onto the blob of diamond paste in the center of the polishing pad (Fig 15). Be careful not to let the tip of the dropper touch the blob of paste.
17. Hold your #1 Starshine mirror by its stem and set it face down on the blob of lubricated diamond slurry in the center of the circle of Kempad polishing cloth, just as you did in step 12. Polish the mirror against the slurry on the polishing cloth for about ten minutes, using clockwise swirling motions and applying a very, very small amount of downward force. From time to time, use the edge of the mirror to work the lubricated slurry back to the center of the polishing cloth. Every time the diamond paste begins to dry out, and the polishing motion becomes harder to perform, add a few drops of lubricant and go on with your polishing. Do not let the slurry dry out.
18. Wash the mirror in running tap water, wipe it dry very carefully with lint-free lens tissue and examine its surface. (Don't touch the mirror's face with anything but the lens tissue, or you will scratch it in the process of examining it.) Wash your hands with soap and water. You should now be able to see a very good image of your own face or the filament of a light bulb in your Starshine mirror. Keep repeating step 17, using progressively less downward force, until you cannot see any scratches or dimples in the mirror's surface with your unaided eye (Fig 16). When you are satisfied with the result, wash your mirror with running tap water, dry it very carefully with a piece of lint-free lens tissue and set it aside, face up, on a piece of paper towel.Repeat steps 17 and 18 for your #2 Starshine Mirror, using the same circle of Kempad polishing cloth and Hyprez 1(W)47-MA polishing compound as you used for your #1 mirror. You don't need to add any more polishing compound.
Don't peel the circle of Kempad polishing cloth off the glass backing plate until after you have completed steps 19 and 20, described below, for both mirrors, just in case you need to do some additional polishing.
PHASE THREE - MIRROR FLATNESS TESTING
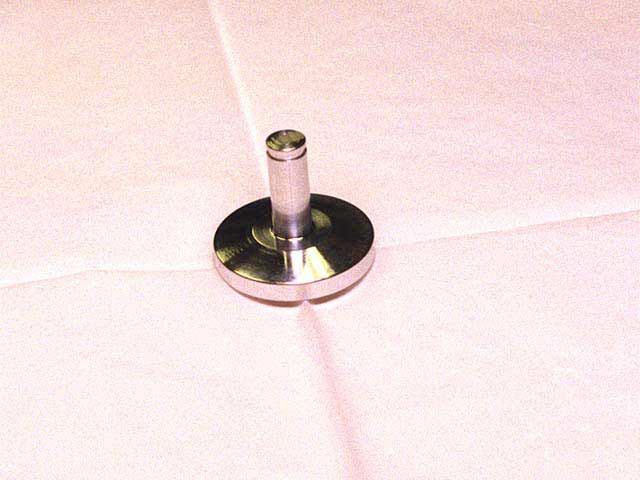
19. Remove the circular glass optical flat from your shipping container, wash it in running water, dry it with a piece of lint-free lens tissue, and dry your hands with a paper towel. Pick up one of your Starshine mirrors by its stem and hold the mirror face up (Fig 17). Have a second member of your team lay a clean piece of lens tissue on the face of the mirror. The person holding the mirror should then grasp the optical flat by its frosted rim and place it on top of the lens tissue. Make sure the arrow, which is marked on the side of the flat, is pointing downward (Fig 18). Then have the second person grasp the corner of the lens tissue and gently pull it out from between the mirror and the optical flat, while you gently press the mirror and the optical flat together. The purpose of this exercise is to pull out all dust particles from between the mirror face and the optical flat. If you don't do this step right, you won't be able to measure the mirror's flatness. When your partner has pulled the lens tissue free, the optical flat will be resting on the face of the mirror (Fig 19). Be sure to look at the demonstration of this process on the Starshine Web Site or the video tape, because this is really hard to explain in writing.
20. While gently holding the optical flat against the mirror, tilt them until you can see the reflected image of a fluorescent light in your mirror. (Incandescent light or sunlight cannot be used for this measurement.) Now look for some faint, colored, alternating, light and dark, concentric interference fringes in the reflected image of the fluorescent light (Fig 20). They look like a faint bullseye, or tree rings, or the rings that you can sometimes see in oil floating on water. They are hard to see and even harder to describe, so it may take you several tries before you can make them out. When you finally see them, count the dark rings and divide by two. This number will tell you, in wavelengths of visible light, how close to perfectly flat your mirror is. If you can see fewer than 20 rings, then your mirror is flat within 10 wavelengths of visible light, and you have done your job well. (You will actually be able to get a lot fewer than 20 rings.)Repeat steps 19 and 20 for your #2 Starshine mirror.
21. If you get scratches on either of your mirrors during the flatness measurement process, go back and repeat steps 17 and 18 one last time, without steps 19 and 20.
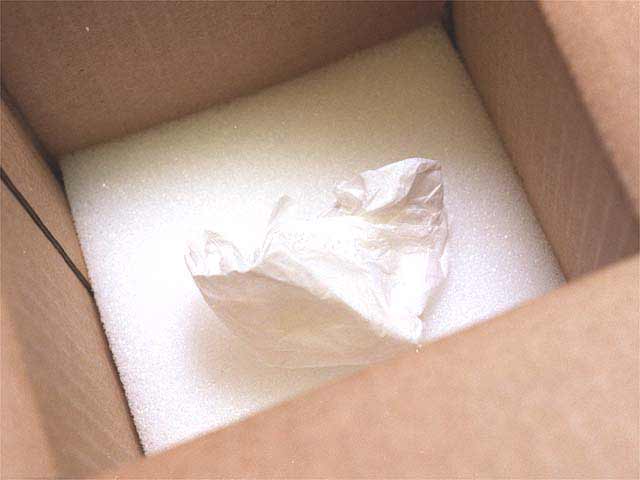
22. When you have ground, polished and measured both mirrors, place the best of the two mirrors face down on a piece of clean, lint-free lens tissue (Fig 21). Wrap the tissue around the mirror, tape the tissue closed, and place it in the small cardboard box with the Starshine return address label that was included in your polishing kit (Fig 22). Sandwich the wrapped mirror between the two small pieces of foam that came with your kit.
23. Have all the participants in the project at your school type and sign their names on a piece of white paper that also contains the name and address of your school. Fold the paper and place it on the top piece of foam in the self-addressed return box. Close the box and tape it shut. Place a return label on the box with the address of your school, affix the proper postage to the outside of the box above the return label and mail it back to the Starshine Project at the address printed on the box.24. Place the second-best mirror, together with a copy of all the participants' names, in your school's trophy display case or other prominent location.
Now then, here's what will happen to your best mirror after it leaves your school:
Shortly after you finish polishing your mirrors, Oxygen in the air will react with their surfaces to form a thin film of Aluminum Oxide, which isn't nearly so reflective to visible light as pure Aluminum is. Therefore, when we receive your best mirror from you, we'll ultrasonically clean it, put it in a vacuum chamber and cover up the unwanted thin film of Aluminum Oxide by vaporizing a mono-molecular layer of fresh Aluminum over the top of it. Then, without breaking vacuum, we'll deposit a half-wave-thick layer of Silicon Dioxide on top of the fresh Aluminum to seal out Oxygen, as well as to protect the mirror's surface from scratching during all the handling discussed below.
We will photograph the piece of paper with all your personal names and your school's name on it, reduce the image to a MicroDot, and affix it to the back of your mirror. We'll then mount on the spacecraft all the mirrors we have received from schools all over the world and subject the assembly to vibration and thermal/vacuum testing, take it to NASA's Goddard Space Flight Center, install it in a Hitchhiker canister, ship the canister to NASA's Kennedy Space Center and install it in the cargo bay of one of NASA's Space Shuttle orbiters, so you can watch it go twinkling across the sky in the operational phase of the program.We realize that these instructions are long and laborious, for which we apologize, but we feel that it is important to make them very specific, so you can have something to refer to when you get stuck. If you have problems with these mirror grinding and polishing procedures and need assistance, please send an e-mail message with your questions and comments to: gilmoore12@aol.com.
Thanks for participating in the initial phase of the Starshine program. The NASA Administrator has promised to let other groups of students fly ten more satellites at a rate of one per year. That way, students will be able to determine atmospheric density variations throughout a complete eleven-year solar cycle.
ACKNOWLEGEMENTS
The Starshine Project is deeply grateful to Mr. Bob McGillicuddy and Mr. Joe Zurlinden of the White Sands Missile Range for developing and adapting this metal mirror grinding and polishing process for our use on this project. We are also sincerely grateful to the U.S. Space and Rocket Center, the Rocky Mountain NASA Space Grant Consortium, the Bridgerland Applied Technology Center, the Aerospace States Association, Lightpath Technologies, the Packager, Inc., for either funding or furnishing the materials included in this kit. Finally, we're grateful to Mr. Charles L. Elms of the U.S. Air Force Academy for the photographic images contained in this section.Return to Project Starshine Home Page (http://www.azinet.com/starshine/)